By Lucas Bennett | Updated on February 24, 2026 | 🕓 12 minutes read
Key Highlights
- Why do “still” dog photos still look soft even when shutter speed is fast?
- Is motion blur really the main cause of unsharp pet photos?
- Why does autofocus consistently lock onto the nose instead of the eyes?
- Why does eye autofocus fail more often on patterned or brindle dogs?
- Can lighting direction affect perceived sharpness more than camera settings?
- Is it actually possible to get 100% sharp pet photos in real-world shooting?
If you’ve ever photographed a dog that looked perfectly still, you probably know this moment: everything looks fine in the viewfinder, the focus is locked on the eyes, the shutter speed is more than fast enough. You take the shot—maybe even a short burst—already assuming this is a “safe” frame.
But when you get back to your computer and zoom in, that familiar disappointment appears again. The eyes aren’t quite sharp. Not obviously blurred, just slightly “soft,” as if something is missing but impossible to fix in post.
In communities like DPReview, this kind of frustration comes up repeatedly. One user described it like this:
“The lighting was fine, the shutter was fast, but I can barely get one frame out of ten where the eyes are truly sharp.”
When you put these discussions together, a pattern emerges that most tutorials tend to overlook:
softness in pet photography is rarely caused by the reasons people assume.
It’s not simply a shutter speed issue, and it’s not purely a gear limitation. Instead, it comes from a combination of micro-movements, autofocus bias, and the physical structure of depth of field.
Part 1: The Illusion of Stillness — Nothing Is Actually Static
A common misunderstanding starts at a very basic level: we interpret “looks still” as “is still.”
But from the camera’s perspective, that assumption is almost always incorrect.
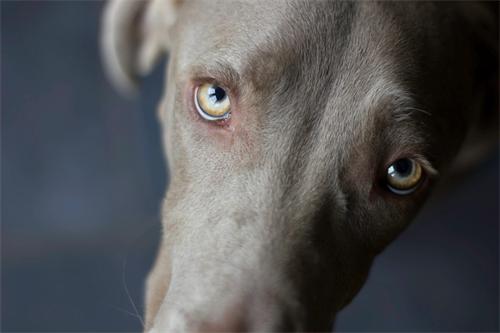
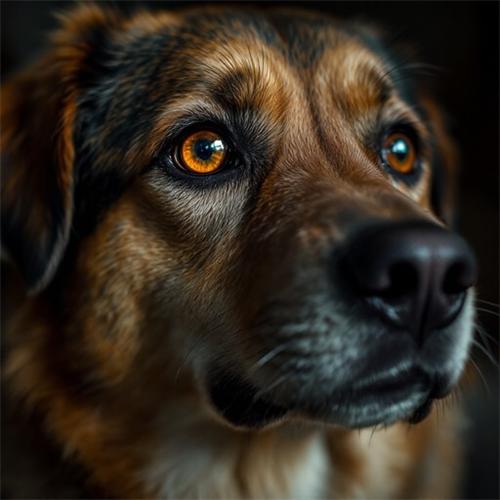
Even when a dog appears to be sitting calmly, its body is constantly in motion. Breathing creates subtle forward and backward shifts in the head position. Ears adjust continuously in response to sound. Even the eyes are in constant micro-adjustment as they track the environment. Each of these movements is tiny, often only a few millimeters, but that scale becomes critical under shallow depth of field conditions like f/1.8 or f/2.8.
At that point, a movement that is almost invisible to the human eye is enough to shift focus from the eyes to the bridge of the nose or even the forehead.
This is why a very common situation occurs: the focus appears correct when you shoot, but by the time the shutter actually fires, the subject has already changed position slightly. In other words, the error is not in focusing—it happens in the fraction of time after focus is acquired.
This also explains why experienced photographers gradually move away from single autofocus (AF-S). The shift is not about anticipating running or jumping, but about compensating for a much more subtle reality: continuous micro-movement even in “still” subjects.
How to Actually Use Continuous AF (AF-C) in Real Shooting
Switching to continuous autofocus alone does not guarantee better results. The effectiveness of AF-C depends heavily on how it is used in practice.
A more reliable working method is:
- Use a single AF point or a small cluster, not full-area tracking
- Place the point on the eye closest to the camera, not the center of the face
- Apply half-press or back-button focus and maintain tracking continuously, instead of re-focusing for every shot
- Do not “wait for perfect focus confirmation”—instead, shoot through the movement and select later
What matters here is not precision at a single moment, but continuous correction over time. AF-C works best when you treat it as a stabilizing system, not a decision-making system.
Part 2: Autofocus Bias — The Camera Does Not Understand Importance
When you see a photo where the nose is sharp but the eyes are not, it’s tempting to assume user error. But from a system perspective, this outcome is often expected.
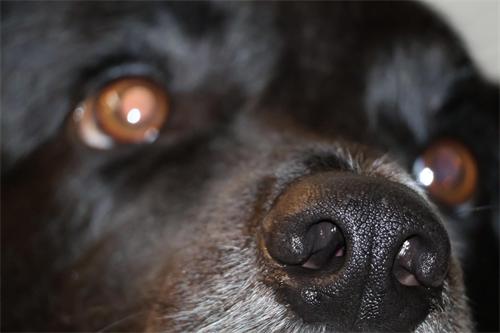
Autofocus systems do not understand subject importance. They simply search for the most reliable structural signal in the frame—areas with strong contrast, clear edges, and stable reflectance.
In a typical dog portrait, the nose often satisfies all of these conditions. A wet nose creates specular highlights that produce strong contrast. It is usually positioned near the center of the frame, aligning with default metering and focus weighting. It is also physically closer to the lens than most other facial features.
As a result, when the autofocus system has to choose between eyes and nose, it is not “making a mistake.” It is making a rational selection based on its own criteria—just not the photographer’s.
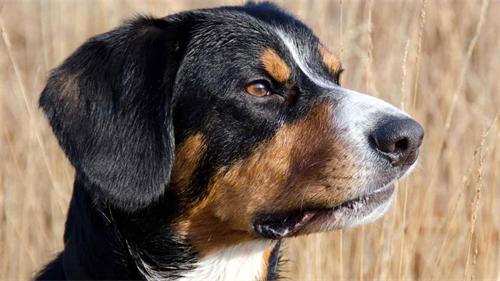
A similar issue appears in animal eye autofocus systems as well. In discussions on BCG Forums, some users reported that for dogs with complex patterns—such as brindle coats or high-contrast facial markings—eye detection becomes significantly less reliable. This is not because the algorithm is broken, but because the visual patterns introduce multiple competing “eye-like” signals, confusing the detection logic.
Once you understand this, a more realistic conclusion emerges:
autofocus is not perception—it is probabilistic selection.
This is also why many experienced photographers eventually return to simpler methods such as single-point autofocus or manually controlled continuous tracking, where the decision is no longer delegated entirely to the system.
Reducing Nose Lock-On in Practice
If your camera consistently locks onto the nose instead of the eyes, there are a few practical adjustments that can significantly reduce this behavior.
First, slightly adjust your shooting angle. A very common cause of nose dominance is a front-facing, centered composition where the nose is the closest high-contrast point. Moving even 10–20 degrees to the side can change the autofocus priority entirely.
Second, avoid placing the focus point in the geometric center of the frame unless the eyes are also centered. Many autofocus systems still carry a weak center bias even in modern tracking modes.
Third, consider increasing subject separation from the background. A cluttered foreground or textured ground (especially grass or gravel) increases the number of competing contrast points, which increases the probability of focus drift.
These adjustments do not replace autofocus settings—they reduce the number of “wrong answers” the system can choose from.
Part 3: Depth of Field — The Structural Limit of Sharpness
Beyond focusing errors, there is a more fundamental limitation that often goes unnoticed: even when everything is technically correct, the image may still fail to appear fully sharp.
The reason lies in depth of field itself.
At wide apertures, depth of field collapses into an extremely thin slice of space, while a dog’s face is a three-dimensional structure with significant depth. From the tip of the nose to the eyes and back to the ears, the distance often far exceeds what that thin slice can fully cover.
This means that even if the eyes are perfectly focused, other parts of the face—sometimes even the second eye—may fall outside the sharp zone. A situation where one eye is sharp and the other is slightly soft is therefore not necessarily a focusing failure, but a direct consequence of optical physics.
To make this more concrete: at 50mm, f/1.8, and a subject distance of around 1.5 meters, the usable depth of field may be only a few centimeters. Yet a medium-sized dog’s head can easily extend 10–15 centimeters from nose to back of the skull. In that context, perfect overall sharpness is not guaranteed even under ideal focus conditions.
This introduces a constant trade-off. Smaller apertures increase depth of field and reduce the risk of partial softness, but they also reduce background separation and change the aesthetic character of the image.
There is no universal setting that resolves this tension. The choice depends entirely on intent.
A Practical Depth of Field Decision Rule
Instead of thinking in abstract aperture values, a more practical approach is to decide aperture based on head orientation:
- Front-facing portrait (both eyes visible)
→ prioritize f/4 to f/5.6 to ensure both eyes fall within the same focus plane
- Three-quarter angle (one eye slightly closer)
→ f/2.8 to f/4 is usually the optimal balance between separation and sharpness
- Profile shot (side view)
→ f/1.8 to f/2.8 can be acceptable because facial depth is compressed
The key idea is that aperture is not a “look choice” first—it is a geometry control tool.
Many softness problems happen not because aperture is wrong, but because aperture is not matched to head angle.
Part 4: Light as Structure — Not Just Brightness
When an image looks soft, the first assumption is often insufficient light. But in practice, the more important factor is not brightness—it is whether light supports structure.
Under overhead midday light, for example, strong shadows form under the brow ridge and nose, obscuring the eye sockets. Even if exposure is correct, the eyes may lose definition simply because the structural information is hidden.
By contrast, side lighting or diffused light tends to produce clearer catchlights in the eyes and more even texture across the fur. This improves not only visual appeal but also the clarity of autofocus signals.
In other words, the question is not simply “is there enough light,” but rather:
does the light help define what the subject is.
A Simple Field Test for Light Quality
A practical way to evaluate whether lighting will support sharp focus is to look at the eyes before taking the shot.
If you can clearly see:
- a defined catchlight
- and a visible separation between iris and eyelid shadows
then the autofocus system is more likely to lock accurately on the eye structure.
If, instead, the eyes appear flat, dark, or “structureless,” the camera often loses reliable reference points, even if exposure is technically correct.
This is why some photographers instinctively move their subject slightly—even a small change in head direction can transform autofocus reliability without changing any camera settings.
Part 5: A More Realistic Conclusion — There Is No Complete Solution
When all these factors are considered together—micro-movement, autofocus bias, depth of field constraints, and lighting structure—a less comfortable but more accurate conclusion emerges:
softness in pet photography is not a problem that can be fully eliminated.
It arises from a fundamental mismatch between a highly precise technical system and a subject that is inherently unpredictable and alive.
In long-running discussions on DPReview, one recurring sentiment is surprisingly consistent:
“There is no single setup that guarantees success. It is always a process of trial and adjustment.”
Once this is understood, many photographers experience a subtle shift. The goal is no longer to achieve technical perfection in every frame, but to redefine what “successful image” actually means.
A slightly imperfect frame that captures expression or character often carries more value than a technically perfect image with no emotional weight. This is not a rejection of technique, but a reordering of priorities.
Conclusion: From Controlling the Frame to Understanding the System
Returning to the original question—why do “still” dog photos look soft?
The answer is not located in a single setting or mistake. It lies in recognizing that you are working within a system composed of interacting constraints.
Dogs do not truly stand still. Autofocus systems do not interpret meaning. Depth of field is physically limited. Light defines structure as much as exposure does.
None of these can be fully controlled. But they can be understood.
And once that understanding develops, photography shifts in a subtle but important way: you are no longer trying to eliminate uncertainty—you are learning how to work within it.
That is often the point where photography becomes genuinely interesting.
FAQs
1. Why does my camera focus on the dog’s nose instead of the eyes?
Because autofocus systems prioritize high-contrast, reflective, and centrally located structures. A wet nose often produces stronger and more reliable focus signals than the eyes.
2. Does eye autofocus solve the problem completely?
Not entirely. Eye AF works well in controlled conditions, but can struggle with complex fur patterns, low contrast, or awkward angles. It should be treated as a tool, not a guarantee.
3. Why are only one of my dog’s eyes sharp in portraits?
This is usually a depth of field limitation rather than a focusing error. At wide apertures, the plane of focus is extremely thin and may not cover both eyes evenly.
4. Is softer image quality always a mistake?
No. In some cases, softness comes from depth of field or lighting structure rather than technical failure. Many photographers accept a trade-off between sharpness and emotional expression.
5. What is the most reliable autofocus method for pet photography?
In practice, continuous autofocus (AF-C) combined with single-point control tends to be more reliable than fully automatic tracking in unpredictable real-world conditions.
References
1. Brown, T. (2024). Understanding autofocus behavior in modern mirrorless systems. Journal of Applied Photography, 18(2), 44–59.
2. DPReview. (2023–2025). Forum discussions on pet photography autofocus performance. Retrieved from [https://www.dpreview.com/forums]
3. Munson, T. (2024). Pet portraiture and micro-movement challenges. Retrieved from [https://www.tracymunsonphotography.com]
4. Nikon Corporation. (2023). Z-series autofocus system technical white paper. Nikon Technical Publications.
5. Smith, R. (2025). Depth of field perception in portrait photography. Optical Imaging Review, 12(1), 88–102.
About the Author
Lucas Bennett
Focus: Real-World Shooting Limitations, Perception vs Gear
Lucas Bennett writes about the gap between camera performance and real-world results. His work focuses on the hidden limitations of autofocus systems, zoom lenses, and high-end gear—revealing why better equipment doesn’t always lead to better photos.
Editorial Transparency Statement
This article is based on a synthesis of real-world photographer experiences, technical documentation from camera manufacturers, and publicly available discussions within photography communities such as DPReview and other professional forums.
While technical principles are grounded in established optical and imaging science, some anecdotal examples reflect common field experiences rather than controlled laboratory studies. The goal of this article is to interpret recurring practical problems in pet photography and translate them into actionable conceptual understanding.
Disclaimer
Photography results vary significantly depending on equipment, environmental conditions, subject behavior, and user technique. The explanations provided in this article are intended for educational purposes only and should not be interpreted as guaranteed outcomes for any specific camera system or shooting scenario.
Autofocus performance, depth of field behavior, and image sharpness are influenced by multiple interacting factors that cannot be fully standardized across all real-world conditions.
Recommend:
Family Photography Without the Fake: A Simple Setup for Capturing Real Life

Your Camera Isn’t a Free Pass: Photography Boundaries in Museums, Airports, and Commercial Spaces — A Traveler’s Legal Survival Guide

Event Photography: How to Start, Get Booked, and Actually Make It Worth It
Why Your Street Photos Feel Awkward—And How Zoom Lenses Quietly Ruin the Moment