

By Daniel Hayes | Updated on March 24, 2026 | 🕓 12 min read
Key Highlights
- Do you actually know how much time you spend on shooting vs. editing vs. communication?
- What are the six stages of a reliable photography workflow from pre-shoot to delivery?
- Why is batch editing more valuable than “perfecting” every image?
- What makes clients perceive you as professional at the moment of delivery?
- How do you calculate your true minimum price to avoid losing money on projects?
- What are “trust signals,” and why do they matter more than your portfolio in the beginning?
- How can you turn one-time clients into repeat customers through system design?
Freelance photography is not a gig where you “work when there’s a job and panic when there isn’t.” It’s a micro-business that requires deliberate system design. Over the past two years, I went from anxious weekly bookings and late-night editing breakdowns to being booked three months in advance and actually having weekends off. The difference wasn’t that I became a better photographer—it’s that I built a system that doesn’t break.
Part 1: Workflow Design — Turning Time from an Enemy into an Ally
1.1 Do a “Time Audit” Before Buying Any Presets
Before optimizing your workflow, you need to face a harsh reality: you probably don’t actually know where your time is going.
I tracked my time for two weeks using Toggl Track, and the results were eye-opening:
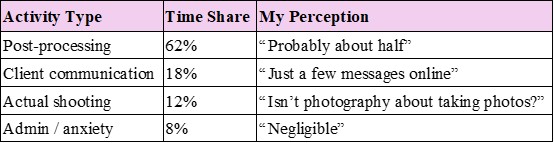
The truth: most photographers spend over 60% of their time editing, while thinking they’re ‘creating.’
Key formula: Effective hourly rate = Total project revenue ÷ (shooting time + editing time + communication time)
Action step: Download any time-tracking app and record one full week. Don’t change your behavior—just observe. After one week, you’ll identify your first optimization point—usually your editing workflow.
1.2 The Six-Stage Workflow: From Chaos to System
After two years of trial and error, I built a six-stage system. This doesn’t limit creativity—it protects your creativity from being drained by operational chaos.
Step 1: Pre-shoot System — Reduce 80% of Anxiety
Client dissatisfaction often shows up after delivery—but it starts before the shoot.
My standard process:
Client confirmation form (sent 72 hours before): time, location, style keywords, outfit suggestions, special requests. Not a survey—a conversation starter.
Shot list alignment: not rigid poses, but 3–5 “must-have” moments agreed in advance.
Moodboard alignment: 3–5 reference images via Pinterest or collage. Key line:
“This isn’t about copying—it’s about aligning our understanding of ‘bright/warm/documentary.’”
Real lesson: A bride once said “natural style.” I thought candid documentary. She meant “effortlessly polished like a magazine.” That shoot required two rounds of revisions. Now, moodboards are mandatory—not optional.
Step 2: On-site System — Protect Your Editing Time
One decision during the shoot can save you 10 hours later.
File naming strategy:
`Date_Client_Scene_Sequence`
Example: `20260420_Mary_Engagement_001`
Sounds tedious? You’ll thank yourself when you don’t have folders full of `IMG_0234_final_final`.
Dual backup rule:
One card continues shooting, another is backed up immediately (GNARBOX or laptop). This is not paranoia—it’s a professional baseline. I’ve seen careers end after losing a full wedding.
In-camera marking:
Use a custom button to star “must-have” shots. Night culling becomes 50% faster.
Step 3: Culling — Three-Layer Filtering Logic
Don’t try to edit everything. That’s an art project, not a business.
My three layers:
1. Technical failures: out of focus, blinking, unrecoverable exposure → delete
2. Emotional value: expression, body language, decisive moments → keep
3. Commercial value: what the client is most likely to choose → prioritize
Tools: Photo Mechanic or Adobe Bridge star ratings
Goal: 15 minutes to reduce to 20–30%
Step 4: Editing — Batch, Not One-by-One
Biggest mistake: editing every photo uniquely.
Reality: clients want consistency and delivery speed.
90% of my images use just 3 Lightroom presets:
Preset A: bright & airy (outdoor daylight)
Preset B: warm film (indoor/golden hour)
Preset C: high-contrast black & white (emotional shots)
Only 10% go into Photoshop for detailed retouching.
Time control:
800 images → 200 selects → 4 hours batch edit + 2 hours retouch = 6 hours total (instead of 20)
Step 5: Delivery — The Peak of Professional Impression
Clients judge professionalism at the moment of delivery.
Standard folder structure:
```
Project Root
├── 01_Highlights_Print_Ready
├── 02_Full_Delivery_Web_Size
├── 03_User_Guide_PDF
└── 04_RAW (optional)
```
Hidden advantage: include a “User Guide” PDF
l Folder explanations
l Print size recommendations
l Social media tips
l Upsell options
Clients often share this—it becomes organic marketing.
Step 6: Post-delivery — The Forgotten Revenue Engine
Send a follow-up within 48 hours:
“Hope you love the photos. Let me know if you need anything else—additional edits or album design are available.”
Upsell opportunities:
l Extra retouched images
l Album design
l Repeat client discounts
1.3 File System — Your Invisible Insurance
Naming rule: `Date_Client_Type_Version`
Folder structure:
```
├── 01_Projects_2026
│ ├── 04_April
│ │ ├── 0420_Mary_Family
│ │ │ ├── RAW
│ │ │ ├── SELECTS
│ │ │ ├── EDITED
│ │ │ └── FINAL
├── 02_Presets_Assets
├── 03_Contracts_Invoices
└── 04_Backup_Offsite
```
3-2-1 backup rule:
l 3 copies
l 2 media types
l 1 off-site
Real lesson: I dropped a hard drive once. Data recovery cost $2000 and three sleepless nights. Now, I don’t sleep until files exist in two places.

Part 2: Pricing Strategy — From Undervaluing to Confidence
2.1 Calculate Your Cost of Doing Business (CODB)
Most photographers guess pricing. That’s a mistake.
You must know your survival number first.
Formula:
Minimum day rate = Annual cost ÷ shooting days
Example:
$40,000 ÷ 90 days = $444/day
If a project takes 3.5 days → minimum $1,550
Reality check: I discovered 70% of my past work was underpriced.
2.2 Three Pricing Models
A: Project-Based (Best for event-type work)
l Weddings, events, product shoots
l Includes clearly defined deliverables: shooting duration, number of retouched images, delivery format
l Example: Wedding package “8 hours of shooting + 50 retouched images + all RAW files + online gallery” = $3,500–5,000
B: Hourly-Based (Best for flexible needs)
l Portraits, family sessions, small commercial work
l Must set a minimum number of hours: starting from 2 hours to avoid fragmentation
l Example: Family portrait “2-hour shoot + 15 retouched images = $800, additional hours +$300/hour”
C: Package-Based (Best for repeat scenarios)
l Newborn growth documentation, annual corporate services
l Upfront payment improves cash flow
l Example: “Annual family documentation” — 4 sessions (maternity / newborn / 100-day / 1-year) = $3,200, 50% upfront to secure booking
2.3 Value Anchoring — The Art of Not Discounting
l Three-tier pricing (basic / standard / premium)
l Break down pricing components
l Break down the pricing: let clients see the value components
Example: “Shooting fee $800 + Post-processing $1,200 + Commercial usage rights $500 = $2,500”
This is easier to accept than simply saying “$2,500,” because the client can clearly perceive what they are paying for.
Usage rights fee (the most overlooked part):
Personal social media use vs. commercial business use can differ by 3–10× in price. I once shot menu photos for a local café: personal-use pricing was $500, while full commercial usage pricing was $2,000. They chose the latter because “it needed to be used on Uber Eats and in local magazine ads.
2.4 Price Increases
Position it as value increase, not just price change.
Price Increase Messaging (sent every January):
“Thank you for your trust over the past year. Due to service upgrades (including XX / the adoption of new equipment XX), my 2026 pricing will be adjusted to XX. Bookings made before January 15 can still lock in 2025 rates.”
Part 3: Client Acquisition — From Chasing to Being Chosen
3.1 Cold Start: Three Practical Paths When You Have No Portfolio
Truth: what you lack is not clients, but “trust signals.” Clients are not buying photos—they are buying “risk minimization.”
Path 1: Collaborative Shoots (Local Businesses)
Do not shoot free portraits for friends—that only attracts more friends who want free work.
Approach local small businesses: cafés, flower shops, gyms, independent designers. Proposal:
“I can shoot product/environment photos for you to use on Instagram and Google Business. I retain portfolio usage rights, and you receive free commercial images.”
Benefits: real commercial portfolio + Google Reviews / reputation + industry connections
Path 2: Assist and Level Up (Second Shooter)
Contact established local photographers and work as a second shooter for weddings or events.
Benefits: learn on-site problem-solving + exposure to real clients (observe how the lead photographer communicates) + build industry relationships (they may refer clients when fully booked)
Path 3: Low-Price Strategy (with strict conditions)
Use only for building portfolio, not as a long-term strategy. Rules:
l Maximum of 3–5 low-priced projects
l Must be your “ideal client type” (if you want to shoot weddings, discount weddings—not everything)
l Clearly communicate: “This is a promotional rate. My standard rate is $XX. I’d appreciate referrals if you’re satisfied.”
3.2 Build a “Passive Client Acquisition” System
Core principles of a portfolio website:
l Vertical positioning: only show the type of work you want to book. Do not mix weddings, products, landscapes—clients won’t know what you specialize in.
l Story-driven presentation: each project includes 3–5 images + a short context (“This was shot for a café’s spring menu—they needed to highlight freshness using natural light.”)
l Must include: real headshot + non-photography interests (to build connection), service workflow (reduce uncertainty), baseline price range (filter unqualified inquiries), clear contact info
Basic SEO optimization:
l Page titles include “city + photography type” (e.g., “Chicago Portrait Photographer”)
l Image ALT text describes the scene (“Natural light family portrait in Lincoln Park”), not “IMG_001”
l Blog content answers real questions: “What colors look best for engagement photos?” “How to schedule a corporate team shoot?”
3.3 “Warm Outreach” — Proactive Marketing Without Being Annoying
Local business partnerships:
Shoot product photos for a flower shop in exchange for in-store credit (“Photography by [Your Name]”). Customers see the images, ask the shop, and get referred to you.
Client referral system:
Include a “referral card” upon delivery:
“Refer a friend, you both get 10% off your next session.”
People prefer win-win, not one-sided asks.
Social media strategy:
Post “process content,” not just final images:
l Lighting setup (“This portrait used one light + soft umbrella, shot by a window at 3 PM”)
l Before/after comparison (“RAW vs edited—note the skin tone adjustments”)
l Failed shots (“This one was out of focus, but the expression was too good to delete”)
This builds authenticity and professionalism—more effective than polished images alone.
3.4 From Inquiry to Booking: The Full Loop for Your First Paid Client
Communication template (reply within 24 hours):
Hello, thank you for reaching out. To provide an accurate quote, could you please confirm:
1. Shooting date and location
2. Type of shoot (portrait / event / product?)
3. Intended usage (personal / social media / commercial?)
4. Expected delivery timeline
For reference: my portrait sessions start at 2 hours and include 15 retouched images, with pricing typically ranging from XX–XX depending on your needs. Looking forward to working with you.
Essential contract terms:
l Delivery timeline (e.g., “within 14 days after the shoot”)
l Revision limit (e.g., “1 revision included for retouched images”)
l Usage rights (e.g., “personal social media use” or “full commercial usage”)
l Cancellation policy (e.g., “cancellation within 7 days forfeits deposit, but rescheduling is allowed”)
Payment structure:
50% retainer to lock the date (bank transfer, Zelle, Venmo Business, or PayPal)
Remaining 50% due one week before the shoot
Real lesson: I once chased payment after delivering a wedding, and the client said, “I’ll pay after I see the photos.” Now I insist on full payment before the shoot, explaining:
“This allows me to fully focus on post-production without being distracted by financial follow-ups.”
90% of clients accept this. The 10% who don’t are usually the ones who cause the most trouble later.
Part 4: System Design — Let the Business Run Itself
4.1 Weekly “CEO Time” (2 Hours)
Set aside one fixed evening each week: close your editing software and open a spreadsheet.
Review three core metrics:
1. Inquiry conversion rate: X inquiries received this week, Y converted. If below 30%, check your response speed or pricing structure.
2. Average order value: this month’s average is $XX. Is the trend increasing or decreasing?
3. Client satisfaction: after delivery, proactively ask: “On a scale of 1–10, how likely are you to recommend me?” Record the feedback.
Adjust next week’s priorities:
l Improve skills (sign up for a workshop)?
l Expand client base (reach out to 3 local businesses)?
l Or optimize workflow (test new post-processing software)?
4.2 Seasonal Cash Flow Management
Peak seasons (wedding season May–October, year-end holidays, pre-Valentine’s):
l Increase pricing by 10–20%
l Control booking volume (quality > quantity)
l Inform clients in advance: “October is fully booked; consider November or book early for next year.”
Off-season (early year, mid-summer):
l Offer “Mini Sessions”: 1 hour / 10 images / fast turnaround, priced lower than standard but with faster cash flow
l Shoot personal projects to update your portfolio
l Maintain equipment and learn new skills
Emergency fund: keep 3–6 months of living expenses. Do not take low-priced jobs out of anxiety—that will trap you in a cycle of “the busier you are, the poorer you get.”
4.3 From “Craftsperson” to “System Owner”
Stage 1 (0–1 year): Do everything yourself
l Build all standardized workflows
l Track time, income, and client feedback for every project
l Goal: stable monthly income that covers living expenses
Stage 2 (1–3 years): Introduce outsourcing
l Hire a retoucher
l Outsource album design and bookkeeping (QuickBooks / Self-Employed)
l Focus on: shooting + client relationships + style development
Stage 3 (3+ years): Studio model or niche specialization
l Train assistants or partners
l Or become a specialist in a niche (e.g., “Tech CEO portrait specialist,” “independent restaurant food photography”)
l Goal: income is no longer directly tied to your time on-site
Conclusion: Photography Is a Craft. The Business Is a System
I used to think success depended on shooting better.
Now I know:
Skill sets the floor. Systems set the ceiling.
FAQs
1. How long should a full photography workflow take from shoot to delivery?
It depends on project size, but a structured workflow can reduce total turnaround time by 50–70% compared to unstructured editing.
2. Do I need expensive tools to build a professional workflow?
No. The system matters more than the tools. Even basic software can be effective if used consistently within a structured process.
3. Should beginners offer free shoots to build a portfolio?
Limited, strategic collaborations can help, but unrestricted free work often attracts low-value clients and weakens pricing confidence.
4. How many images should I deliver to clients?
Quality matters more than quantity. A curated selection (20–30% of total shots) typically provides the best balance between value and efficiency.
5. When is the right time to raise prices?
When your workflow stabilizes, demand increases, or your service quality improves. Annual adjustments are common in professional practice.
References
1. American Society of Media Photographers. (2023). ASMP Professional Business Practices in Photography. ASMP Press.
2. CreativeLive. (2022). Photography Workflow: From Capture to Delivery. Retrieved from [https://www.creativelive.com]
3. Freelancers Union. (2024). Freelance Pricing and Income Stability Report. Retrieved from [https://www.freelancersunion.org]
4. Kelby, S. (2021). The Digital Photography Book, Part 6. Rocky Nook.
5. PPA (Professional Photographers of America). (2023). Benchmark Survey: Photography Industry Trends. Retrieved from [https://www.ppa.com]
About the Author
Daniel Hayes
Focus: Monetization Models, Platforms, Creative Income
Daniel Hayes explores different monetization paths in photography—from stock platforms and content licensing to online portfolios and creator economies. His work analyzes how photographers build income streams beyond traditional client work.
Editorial Transparency Statement
This content is based on the author’s direct professional experience and practical application in real-world photography work. No external sponsorships or paid partnerships influenced the recommendations. All tools, workflows, and strategies mentioned are selected based on usability and effectiveness in actual practice.
Disclaimer
This article is intended for informational and educational purposes only. Results may vary depending on individual experience, market conditions, and geographic location. Readers should adapt the strategies and recommendations to their own business context and consult professionals where necessary for financial or legal decisions.
Recommend:
When Clients Say “Too Expensive”—What They Really Mean (And How to Respond Without Lowering Your Price)

How to Become a Wedding Photographer (and Actually Survive It)

Event Photography: How to Start, Get Booked, and Actually Make It Worth It

Family Photography Without the Fake: A Simple Setup for Capturing Real Life