—Changing Lenses in Travel Situations Is a Bigger Problem Than You Think
By Ethan Cole | Updated on March 31, 2026 | 🕓 8 min read
Key Highlights
- Are you carrying more camera gear but taking fewer photos during your trips?
- How often do you hesitate before pressing the shutter because of lens choices?
- What is your “decision-to-shot ratio,” and is it hurting your photography?
- Do multiple lenses actually increase your creative output—or reduce it?
- Have you ever missed a moment because you were changing lenses?
I still remember the exact moment I realized my gear was working against me.
Kyoto. A narrow alley. Late afternoon. The sun was cutting through wooden facades—perfect light. An elderly woman slid open a door, and a cat darted past her feet. The whole scene lasted maybe four seconds.
I had a 35mm on my camera. Completely wrong for what I wanted. My 85mm was in the bag. I hesitated. By the time I decided to switch lenses, the moment was gone. The cat was inside. The door half closed. The light had shifted.
That night, I went through my memory card. Fewer than forty photos for the entire day.
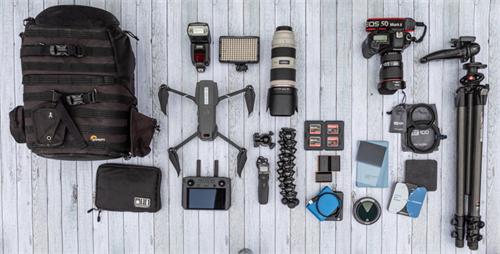
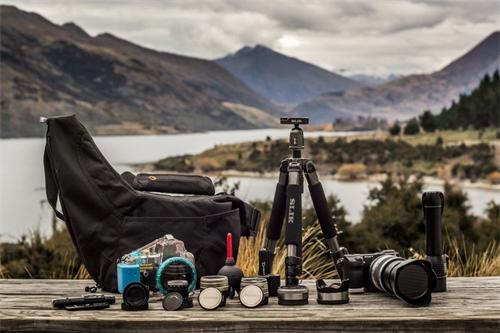
In my bag: three lenses, one camera body, filters, spare batteries.
I had walked over 20,000 steps carrying nearly 4 kilograms of gear.
And the photos?
Honestly, I had more usable shots from my phone.
This wasn’t the first time it happened—and it wouldn’t be the last. But that night, I started asking myself a question I had been avoiding:
Was I preparing to take photos—or preparing excuses not to?
A Rarely Discussed Angle: The “Friction Cost” of Travel Photography
Most discussions about travel photography gear are straightforward:
l This focal length is great for landscapes
l That wide aperture is perfect for portraits
l Bring a telephoto, just in case
Three lenses. Sounds reasonable. Even “minimal.”
But the real problem is never how much you carry.
It’s how many times you interrupt yourself before taking a single shot.
I call it friction cost. It includes:
1. Cognitive Load
Every time you raise your camera, you’re solving a small decision problem:
Which lens? Should I switch? Will I miss something if I don’t? Will I regret it if I do?
The more lenses you carry, the harder the decision becomes.
Each additional option doesn’t just add time—it increases hesitation.
2. Rhythm Disruption
Photography isn’t a series of isolated clicks.
When you’re in a good state, it flows—you start noticing light, anticipating movement, syncing with your surroundings.
Changing lenses is like popping that bubble.
You stop. Open your bag. Twist, swap, close.
By the time you look up again, the rhythm is gone. Getting back into it takes time.
3. Vanishing Opportunity Windows
Many great moments last only three to five seconds.
A glance on the street.
Light hitting a corner just right.
A child turning back toward the camera.
You’re changing lenses.
It’s over.
Three lenses sound like “more possibilities.”
In reality, they often mean more hesitation, fewer photos, and less satisfaction.
This isn’t a technical issue. It’s a decision problem.
More lenses don’t give you more possibilities.
They give you more doubt.
Three Travel Photography Modes — Which One Are You?
After watching many people (including myself) travel with cameras, I’ve noticed a pattern.
Not based on what camera they use—but how they relate to their gear.
A. The Prepared Type
Fully equipped: camera body, two or three lenses, maybe a tripod, filters, extra batteries.
Reality: shoots the least.
Not out of laziness—but because every shot requires a chain of decisions.
Eventually, it becomes: “I’ll just use my phone.”
The real issue isn’t weight.
It’s too many choices.
B. The Over-Minimalist
Only one lens. Usually a zoom or a standard prime.
Yes—they shoot more. No hesitation about switching.
But when reviewing photos later, there’s a pattern: everything looks similar.
Same perspective. Same spatial feel. Same visual language.
It’s not bad photography.
It’s limited expression.
C. The Adaptive Type
This is where I landed after several failed trips.
Not minimal—but intentional.
Very few decisions made on the road.
It’s not about carrying one lens.
It’s about deciding in advance what matters—and using simple rules to reduce thinking during the trip.
It sounds simple.
It took me years to actually learn.
A Key Concept: Decision-to-Shot Ratio
I eventually gave myself a metric:
Decision-to-Shot Ratio
The formula is simple—but revealing:
Good travel photography = High shooting density / Low decision count
In other words:
You’re shooting often, without overthinking.
Bad states look like this:
Your brain is constantly asking “Should I switch?”
But your finger hesitates on the shutter.
I’ve reviewed my own trips. The best days had very few decisions.
The days with the most gear had the most decisions—and the fewest photos.
That’s not a coincidence.
More decisions don’t make you a better photographer.
They make you shoot less.
How to Build a Low-Decision Travel System
I won’t recommend specific gear.
But here’s a framework that has worked for me, across multiple trips.
Step 1: Define Your “Default State”
99% of the time, you use one lens.
Not the “best.” Not the most expensive.
The one that requires the least thinking.
What makes a lens “effortless”?
l A focal length you know intuitively
l An aperture that works in most situations
l A size and weight that keeps your camera in your hand—not in your bag
This lens isn’t for perfection.
It’s for continuity.
My rule is simple:
If I take the camera out of my bag the next day and don’t feel like swapping the lens—that’s the right one.
Step 2: Define “Intentional Switches”
There are only three situations where I actively switch lenses:
l Dedicated portrait shooting
l Needing telephoto compression (distance, details, controlled framing)
l Very low light requiring a fast prime
The key rule:
You don’t decide after seeing the scene.
You decide before you get there.
“Today afternoon = portraits.”
“This location = telephoto.”
Decide early, and you eliminate hesitation later.
Step 3: Add Constraints
This sounds counterintuitive—but constraints create clarity.
What worked for me:
l Only one lens change per day
l One focal length per location
l Leave unused lenses behind (not everything needs to come with you)
Constraints don’t limit your photography.
They sharpen your intent.
The real value happens before you leave—not while you’re standing there hesitating.
A Simple Rule System: Match the Tool to the Intent (So You Don’t Think on the Road)
Most people don’t struggle because they carry too much gear.
They struggle because they don’t have a clear rule for using it.
What finally worked for me was reducing everything to a simple idea:
Don’t start from “What do I have?”
Start from “What am I trying to capture?”
Once you do that, decisions become automatic.
1. Capturing fleeting moments → Use your camera with the default lens (don’t switch)
Use this when:
l Street photography
l Human interactions
l Light changing quickly
l Anything that lasts 3–5 seconds
Rule:
Don’t switch lenses. Just shoot.
The moment you start thinking “maybe another focal length would be better,”
the moment is already gone.
Your camera here isn’t for perfection.
It’s for speed and readiness.
2. Controlling the frame or compressing space → Use a telephoto lens
Use this when:
l Distant subjects or details
l Clean compositions with less background noise
l Architectural layers and structure
l Candid shots without getting close
Simple trigger:
If you don’t want to move closer, but want to “pull the scene toward you,” use a telephoto.
But the key is:
Don’t decide this on the spot.
Decide before you get there:
“This location = telephoto.”
3. Capturing motion and continuity → Use a gimbal or pocket video camera
Use this when:
l Vlogging
l Walking sequences
l Environmental storytelling
l Scenes that need time, not just a single frame
Simple rule:
If the scene needs time to be understood, shoot video.
But avoid this common trap:
Trying to “shoot photos and video at the same time.”
The result is usually:
l Weak video
l Missed photos
A better approach:
For a period of time, commit to video only.
4. Capturing scale and spatial impact → Use a drone
Use this when:
l Road trips (especially self-driving travel)
l Coastlines, mountains, open landscapes
l City overviews (where permitted)
l Sunrise / sunset scenes
Quick test:
Would this scene look completely different from above?
If yes, it’s worth flying.
But don’t try to use it everywhere.
A more effective rule:
l Use it at pre-planned locations, or
l Only when you encounter a clearly “stop-the-car” moment
For example: a clean road, perfect light, open space
→ Stop → Fly → Shoot → Leave
Not: “Should I fly here too?”
5. Casual, low-friction recording → Use your phone
Use this when:
l Meals, breaks, in-between moments
l Social situations
l Places where taking out a camera feels intrusive
A practical mindset:
Not every moment needs “photography mode.”
Sometimes your phone helps you keep recording without breaking the experience.
One-Line Summary (Easy to Remember)
You can compress everything into this:
> Moments → Camera
> Control → Telephoto
> Motion → Video
> Scale → Drone
> Ease → Phone
Why This Works
This system isn’t about using the “right tool.”
It’s about eliminating hesitation.
The moment you start asking:
“Which one should I use?”
You’ve already lost time.
And in travel photography,
that’s often the difference between getting the shot—and missing it.
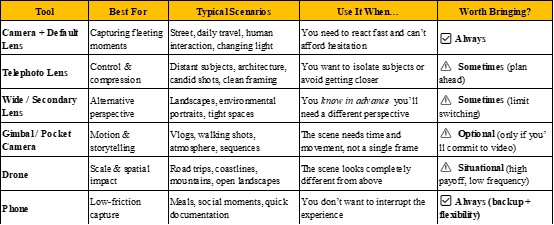
“Always” → Core tools. These define your baseline shooting experience.
“Sometimes” → Only bring if you have a clear plan to use them.
“Optional / Situational” → High impact, but only in specific conditions.
If a tool doesn’t have a clear “when I will use this” scenario before you leave,
it’s probably just extra weight—and extra decisions.
I Learned This the Hard Way
I didn’t figure this out from the start.
I once brought a full three-lens setup to Iceland:
Wide for landscapes.
Standard for portraits.
Telephoto for wildlife.
Sounds logical, right?
Reality: I spent 80% of my time hesitating.
l Waterfalls: wide or standard?
l Horses in the distance: is it worth switching?
l Portraits: should I go back to wide for environmental shots?
The best photos from that trip?
Came from the simplest day—when I left two lenses in the car and walked out with just a 35mm.
I took over 300 photos that day.
More than the previous three days combined.
There’s also a physical side to friction cost.
On a trip in Southeast Asia, frequent lens changes + high humidity led to dust on my sensor.
Back home, I saw the same dark spots across multiple images.
Fixing them took hours in post.
This isn’t about zoom vs prime.
It’s about this:
Every lens change has a real cost—
Dust. Time. Missed moments.
Costs you rarely consider before the trip—but always pay during it.
Three System Types (For Reference)
Depending on how you travel and what you want to shoot, you’ll likely lean toward one of these:
Lightweight System
l Best for: city travel, casual documentation, light hiking
l Core idea: one familiar lens, camera always in hand
l Trade-off: you’ll miss some shots—but capture more personal ones
Balanced System
l Best for: mixed travel (landscape + street + occasional portraits)
l Core idea: two lenses—one default (90% of use), one for specific scenarios
l Rule: switch once per day, decided in advance
Project-Oriented System
l Best for: trips with a clear creative goal
l Core idea: gear is entirely built around that goal
Portrait trip? Bring portrait gear.
Wildlife trip? Telephoto becomes your default.
None of these are better than the others.
The only question is:
Does it fit this trip?
A Few Honest Final Thoughts
Travel photography has never been about how much gear you bring.
It’s about whether you’re actually observing.
Whether you act within those three-to-five-second windows.
Whether, when you look back, you see:
“I captured it.”
Not:
“I should have switched lenses.”
My experience boils down to this:
Bring a little less.
Think a little more.
Decide earlier.
Hesitate less on the road.
The moment you’re willing to take your camera out anytime—
that’s when you finally have a travel kit you’ll actually use.
FAQs
1. Is it better to use a zoom lens instead of carrying multiple prime lenses for travel?
It depends on your shooting style. Zoom lenses reduce the need for switching and lower friction cost, while prime lenses often offer better image quality and wider apertures. The key is minimizing decision fatigue, not chasing specifications.
2. How many lenses should I realistically bring for a typical trip?
For most travelers, one to two lenses is optimal. More than that often increases hesitation and reduces actual shooting frequency.
3. What focal length is best as a “default lens”?
There is no universal answer, but commonly used ranges like 28mm–50mm (full-frame equivalent) tend to balance versatility and familiarity. The best choice is the one you intuitively understand.
4. How can I avoid missing moments while traveling?
Pre-decide your shooting intent for the day or location, keep your camera accessible, and reduce the need for on-the-spot decisions—especially lens changes.
5. Does carrying less gear really improve photography results?
In many real-world travel scenarios, yes. Less gear often leads to more shooting, better timing, and stronger engagement with the environment.
6. Is sensor dust a serious issue when changing lenses frequently?
Yes, especially in humid or dusty environments. Frequent lens changes increase the risk of dust spots, which can be time-consuming to fix in post-processing.
References
1. Ericsson, K. A., & Pool, R. (2016). Peak: Secrets from the New Science of Expertise. Houghton Mifflin Harcourt.
2. National Geographic. (2022). Travel photography tips: How to capture better moments. Retrieved from [https://www.nationalgeographic.com]
3. Cambridge in Colour. (2021). Understanding focal length and perspective in photography. Retrieved from [https://www.cambridgeincolour.com]
About the Author
Ethan Cole
Focus: Tools, Camera Systems, Workflow Efficiency
Ethan Cole is a photography technology writer focused on camera systems, lens selection, and practical shooting setups. His work explores how photographers build efficient, flexible toolkits that reduce friction in real-world shooting—from everyday family moments to fast-changing travel scenarios.
Editorial Transparency Statement
This article is based on first-hand experience, independent field observations, and practical shooting scenarios encountered during travel. It does not promote or endorse specific camera brands or products. Any gear-related references are included solely to support reader understanding and are not influenced by sponsorships or affiliate partnerships.
Disclaimer
The information provided in this article is for educational and informational purposes only. Individual results may vary depending on personal shooting style, environment, and equipment used. Readers are encouraged to adapt the concepts to their own workflow and travel conditions.
Recommend:
Event Photography: How to Start, Get Booked, and Actually Make It Worth It
You’re 0.3 Seconds Faster Than Your Camera—And That’s Why You Miss the Decisive Moment

Your Camera Isn’t a Free Pass: Photography Boundaries in Museums, Airports, and Commercial Spaces — A Traveler’s Legal Survival Guide
Why Portrait Photography Isn’t Turning Into Income (And What Actually Fixes It)